Android App
Configure and run the Android App for the first time.
Open the project in Android Studio
- Open the project in Android Studio by selecting the directory you created while cloning.
- Select the
projectview from the dropdown in the top left corner.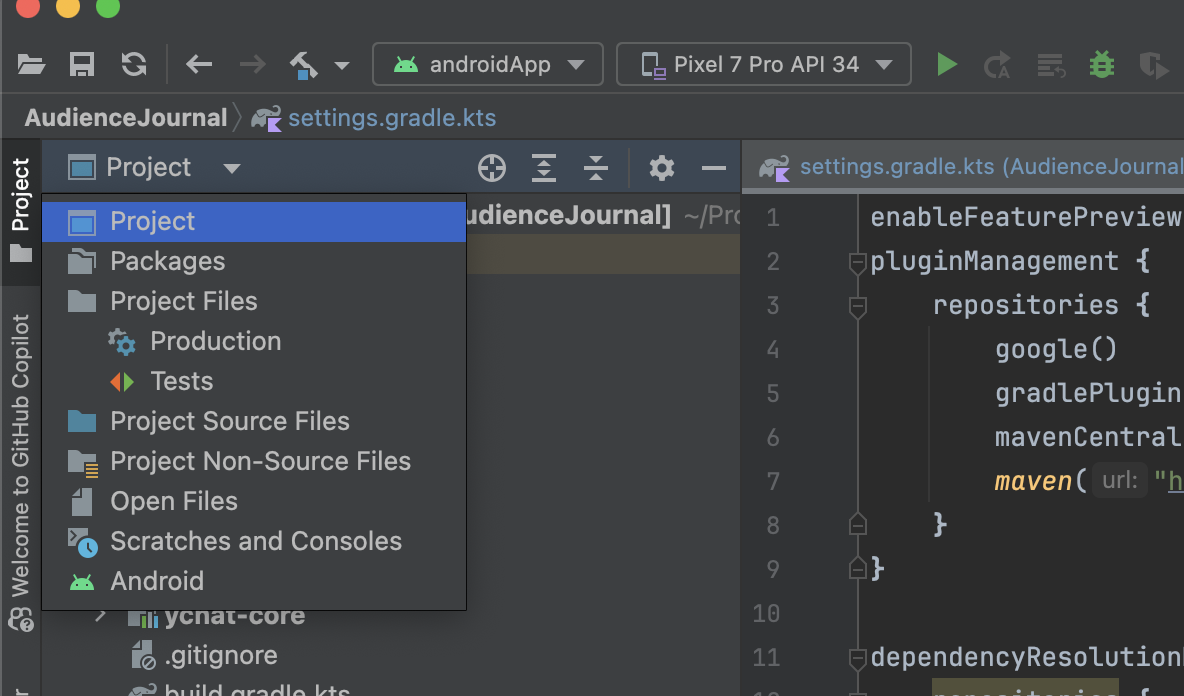
- Update the
rootProject.nameproperty insettings.gradle.ktsto match your project name (without spaces). This will be the name of the project in the Android Studio not the app name. - Sync the project by clicking on the
Sync Project with Gradle Filesbutton.
Update local.properties and create signing keys
Look for the file local.properties in the project root folder and add the following content after the existing content:
DEBUG_PASSWORD=[YOUR_DEBUG_PASSWORD]
RELEASE_PASSWORD=[YOUR_RELEASE_PASSWORD]
replace [YOUR_DEBUG_PASSWORD] and [YOUR_RELEASE_PASSWORD] with different passwords you want to use for your signing keys (avoid special characters and passwords shorter than 12 characters).
- Can't think of a good password for the keys? Use a password generator. Uncheck the special characters option.
Open a terminal in the root of the project and run the following commands:
cd androidApp
⚠️ Before running the following command replace [DEBUG_PASSWORD] with the password you added to the properties file.
keytool -genkey -v -keystore debug_keystore.jks -storepass [DEBUG_PASSWORD] -alias androiddebugkey -keypass [DEBUG_PASSWORD] -keyalg RSA -keysize 2048 -validity 10000 -dname "CN=Android Debug,O=Android,C=US"
⚠️ Before running the following command replace [RELEASE_PASSWORD] with the password you added to the properties file.
keytool -genkey -v -keystore release_keystore.jks -storepass [RELEASE_PASSWORD] -alias androidreleasekey -keypass [RELEASE_PASSWORD] -keyalg RSA -keysize 2048 -validity 10000 -dname "CN=Android Release,O=Android,C=US"
Update app name and app id
- Replace
MobileStackwith your app name inandroidApp/src/main/res/values/strings.xml. (this will be the app name visibile in the phone) - Replace
com.zenithapps.mobilestack.androidwith your application id inandroidApp/src/build.gradle.kts/applicationId. (⚠️ DO NOT MODIFY THEnamespaceproperty) - Sync the project by clicking on the
Sync Project with Gradle Filesbutton.
Replace only the applicationId property and NOT namespace otherwise you will have to update the namespaces in all the files.
For applicationId is recommended to use a url that you own, reversed. It will be your unique identifier in the app stores and cannot be changed once your app is published in the stores.
Configure Firebase services
Go to Firebase
- Create a new project
- Enable Analytics
- Use a new Analytics account for this project
- Choose the country where your app will be published / will be legally available
Add your Android app
From the overview or project settings / general add an Android app to the project.
- Click on the Android Icon under your project name.
- Use the same package name as the one you chose in the previous step.
- Use your app name as nickname. (No need to add Android as platform will be identified with an icon)
- Download the
google-services.jsonfile and place it in theandroidAppdirectory. - Skip SHA certificate and adding the SDK.
Make sure you add the google-services.json file to the /androidApp directory and not the /src directory.
Enable Firebase Auth
- From your projects Firebase overview, in the left menu go to
Build/Authentication. - Click on
Get Started - Go to
Sign-in methodtab and enable providersEmail/PasswordandAnonymous. Click onSave.
Enable Firebase Firestore
- From your projects Firebase overview, in the left menu go to
Build/Firestore Database. - Click on
Create database - Select a database region where your app will be published / will be legally available.
- Select
Start in production mode. - Once finished, click on the
Rulestab and replace all the rules code with the following:
rules_version = '2';

service cloud.firestore {
  match /databases/{database}/documents {

     // Match documents in the "users" collection where the document ID matches the user's auth UID
    match /users/{userId} {
      // Allow read and write access only if the user is authenticated and the userId matches their auth UID
      allow read, write: if request.auth != null && request.auth.uid == userId;
    }

    // Match all other documents
    match /{document=**} {
      // Deny read and write access to all other documents
      allow read, write: if false;
    }
  }
}
- Click on
Publish.
Enable Firebase Remote Config
- From your projects Firebase overview, in the left menu go to
Run/Remote Config. - Click on
Create Configuration - Create a test string parameter with the key:
TESTand default value:TEST. - Click on
Save - Click on
Publish changes.
Running the app
In Android Studio:
- Create an emulator using the
Device Manageror connect your physical device. - Click on the green play button to run the app.
- You will see MobileStack running on your device.
Troubleshooting
- File
debug_keystore.jksnot found -> Make sure you are in theandroidAppdirectory when running the keytool command. Cause: failed to decrypt safe contents entry: javax.crypto.BadPaddingException-> The password you chose is too short or contains special characters. Alternatively, the password that you have entered in thelocal.propertiesfile is incorrect.- No matching client found for package name -> The package name you chose in the
applicationIdproperty is not the same as the one you chose in the Firebase console. Remove the app from the Firebase console and add it again using the correct package name. - Deprecated Gradle features: The project is using deprecated Gradle features. Update the Gradle wrapper to the latest version. -> Update the Gradle wrapper to the latest version.
- Cannot generate project dependency accessors because project 'YOUR PROJECT NAME' doesn't follow the naming convention:
[a-zA-Z]([A-Za-z0-9\-_])*-> The project name you chose in thesettings.gradle.ktsfile is not following the naming convention. Replace the project name with a valid one.
If you are having any other issues, please contact us at support@getmobilestack.com or through the Discord and we will be happy to help you.